Best Paper for Hand Lettering Practice: Types and What to Avoid
Why smooth paper protects your pens and sharpens your lines, which paper types suit practice and finished pieces, what feathering, bleeding and ghosting mean, and a five-minute test page to try first.
When a new brush pen starts to look fuzzy at the tip, or lines that should be crisp come out with soft, hairy edges, the pen usually gets the blame. Quite often the cause is underneath it. The right paper for hand lettering is mostly a matter of one quality, smoothness, and it does not have to be expensive.
This guide explains what paper does to ink and to pen tips, walks through the common types and ends with a simple test page you can make before buying a lot of anything.
Why smoothness matters
Under a magnifying glass, paper is a mat of fibers. On smooth paper the fibers are pressed flat and often coated. On rough paper they stand up like the surface of a towel.
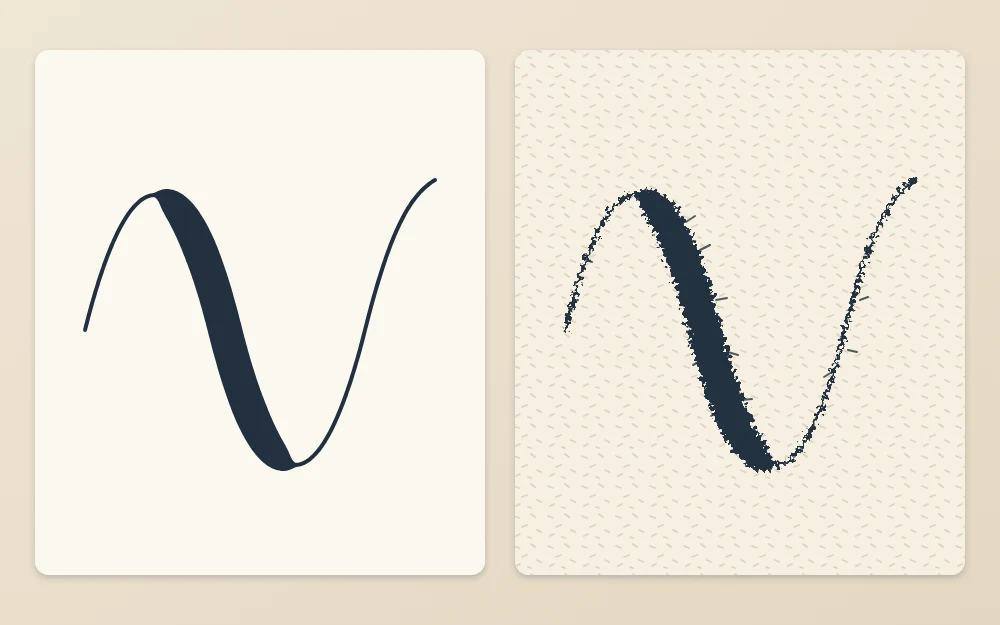
That texture causes two problems. First, it wears the pen. A felt or fiber tip dragged across a rough surface catches on the fibers, and over time the point splits and frays. A frayed brush pen can no longer make a clean thin upstroke. Second, texture breaks up the line itself. The tip skips over the low spots, so the edge of the stroke looks ragged instead of sharp.
Run a clean fingertip across the sheet. If you can feel a grain, a brush pen will feel it too.
Feathering, bleeding and ghosting
Three words describe most ink problems, and they are easy to mix up.
- Feathering: ink spreads sideways along the fibers, so the edge of a line grows tiny hairs. The line looks wider and softer than the stroke you made. It happens on absorbent, uncoated paper.
- Bleeding: ink soaks right through and marks the back of the sheet, and sometimes the sheet below. Wet markers on thin paper are the usual cause.
- Ghosting: the ink has not come through, but you can see its shadow from the other side. It is harmless unless you want to use both sides.
Feathering is the one that spoils lettering, because it changes the shape of your strokes. For bleeding, a spare sheet underneath protects the next page.
Paper types for practice
Smooth printer paper
Ordinary office paper works for pencil and fineliner practice. For brush pens and markers, look for a heavier, smoother sheet: around 24 to 32 lb (90 to 120 gsm) and described as smooth or made for laser printers. It costs little per sheet, which matters when you fill pages with drills.
Marker paper
Marker paper is thin, very smooth and coated so that ink stays on the surface. Lines come out crisp, colors look bright and tips glide. It is slightly see-through, so you can slide a guide sheet underneath. It is the kindest surface for brush pens.
Tracing paper
Tracing paper is smooth, hard and translucent. Lay it over your own pencil sketch to refine it, or over a guide sheet you have ruled yourself, and letter on top. Ink dries slowly on it, so give each line time.
Dot grid and graph pads
A dot grid or graph pad gives you ready-made horizontal and vertical references, which saves ruling every line. Dots are quieter than a full grid and nearly disappear behind finished work. Quality varies, so test one sheet for feathering before filling the pad. If you would rather rule plain paper, see how to make your own practice sheets.
Paper for finished pieces
For a card, a sign or anything you plan to keep, use smooth cardstock. It is stiff, takes ink without buckling and survives erasing. Check the surface the same way as any other paper; cardstock is sold in both smooth and textured finishes, and only the smooth kind suits fine tips.
Sketch on cheap paper first, so the good sheet sees as little erasing as possible.
What to avoid
- Textured art papers such as cold-press watercolor paper, pastel paper and rough sketch paper. They are made to grip paint or chalk, and they chew through brush pen tips.
- Very thin, absorbent paper such as newsprint or bargain notebook pages. Ink feathers and bleeds.
- Handmade or fibrous paper with visible flecks. Lovely to look at, hard on pens.
- Glossy photo-style paper. Many inks sit on top without drying and smear.
Textured paper is not useless. A pencil, a bullet-tip marker or a water brush handles it far better than a felt brush tip; the guide to pen types for beginners describes each tip.
Common mistake
Practicing brush strokes in a sketchbook with toothy drawing paper. The texture that helps pencil shading is exactly what frays a brush pen. Keep a separate stack of smooth sheets for anything with a felt tip.
Paper types at a glance
| Paper | Best for | Watch out for |
|---|---|---|
| Smooth, heavier printer paper | Daily drills with any pen | Thin, rough office paper feathers |
| Marker paper | Brush pens and markers | Thin; costs more per sheet |
| Tracing paper | Refining your own sketches | Slow drying, smudges |
| Dot grid or graph pad | Guide lines without ruling | Uneven quality between pads |
| Smooth cardstock | Cards and finished pieces | Textured finishes |
Make a test page before you buy much
Buy or borrow a single sheet or the smallest pad, and run the same five checks on it. The whole test takes about five minutes.
- Thin lines. Draw five slow lines with a fineliner. Look closely at the edges for hairs.
- A filled square. Color a square about 1/2 in (1.3 cm) across with your wettest marker. Look for spreading past the outline.
- Brush strokes. If you own a brush pen, make a row of thin upstrokes and thick downstrokes. The edges should be clean and the tip should glide without a scratchy feel.
- Smudge test. Write a word, count to five and wipe a finger across it. Repeat after ten seconds. This shows how long the ink needs.
- Turn it over. Check the back for bleeding and ghosting.
Write the paper type in the corner and keep the page as a reference.
Tip
Slow-drying, coated papers smudge more easily. Left-handed readers may prefer a slightly less slick sheet with a fineliner, or can place a scrap sheet under the hand while the ink sets.
A sensible starting stack
You do not need every type. A ream of smooth, heavier printer paper covers nearly all practice. Add a small pad of marker paper when you start using brush pens, and a few sheets of smooth cardstock when you want to make something to give away. The rest of a basic kit is listed in the guide to starter supplies for lettering.
Frequently asked questions
Can I use regular printer paper for hand lettering?
Yes, for pencil, fineliner and most marker practice. For brush pens, choose a smoother and somewhat heavier printer paper than the cheapest office kind, because rough, thin sheets feather and wear down felt tips. Run a fingertip over the sheet; it should feel slick rather than grainy.
Why is my brush pen fraying?
The most common reason is textured paper. Each stroke drags the felt tip across raised fibers, which gradually split the point. Pressing very hard and scrubbing sideways speed it up. Moving to marker paper or a smooth, heavier printer paper usually slows the wear a great deal.
What is the difference between feathering and bleeding?
Feathering is ink spreading sideways on the surface, which gives lines fuzzy, hairy edges. Bleeding is ink soaking down through the sheet and marking the back. A paper can do one without the other. Feathering harms the look of your letters, while bleeding mostly affects the page beneath.