Basic Lettering Strokes: The 8 Shapes Behind Every Letter
Learn the eight basic strokes that build almost every lowercase letter: where each one starts, which letters it makes, and how to practice it as a row before you move on to whole letters.
Lesson at a glance
What you need
- HB pencil
- Soft eraser
- Ruler
- Fineliner pen
- Small firm-tip brush pen (optional)
- Smooth paper
A lowercase alphabet has 26 letters, but it does not have 26 unrelated shapes. Almost every letter is assembled from the same few movements, repeated and combined. Those movements are the basic lettering strokes, and learning them first is the most direct route to letters that look as if they belong together.
There are eight of them. Practice the strokes as rows before you practice whole letters, and the letters arrive with far less struggle.
What you need
Use a pencil, a ruler and smooth paper with a baseline and an x-height line ruled about 3/8 in (1 cm) apart. Add an ascender line and a descender line the same distance above and below. Any pen works for the strokes themselves: a fineliner, a gel pen or a small firm-tip brush pen.
The eight strokes, one at a time
- Upstroke: start on the baseline and travel up and to the right in a light, slightly curved line until you reach the x-height line. It is the connecting stroke that leads into most letters.
- Downstroke: start on the x-height line and pull straight down to the baseline. Keep it at one slant, upright or leaning, and keep its sides parallel.
- Overturn: start on the baseline, go up, curve over at the x-height line and come down to the baseline again. It is an arch, like an upside-down u.
- Underturn: start on the x-height line, come down, curve at the baseline and go back up. It is a cup, like the letter u without its last stroke.
- Compound curve: an overturn joined to an underturn in one movement: up, over, down, under and up. The down part in the middle should be straight.
- Oval: start at about two o’clock on the shape, travel counterclockwise over the top, down the left side, around the base and back up to close it. Make it narrower than a circle.
- Ascending loop: start on the x-height line, travel up and to the right to the ascender line, turn over to the left and come straight down to the baseline.
- Descending loop: start on the x-height line, come straight down to the descender line, turn to the left and travel back up, crossing the stem at the baseline.
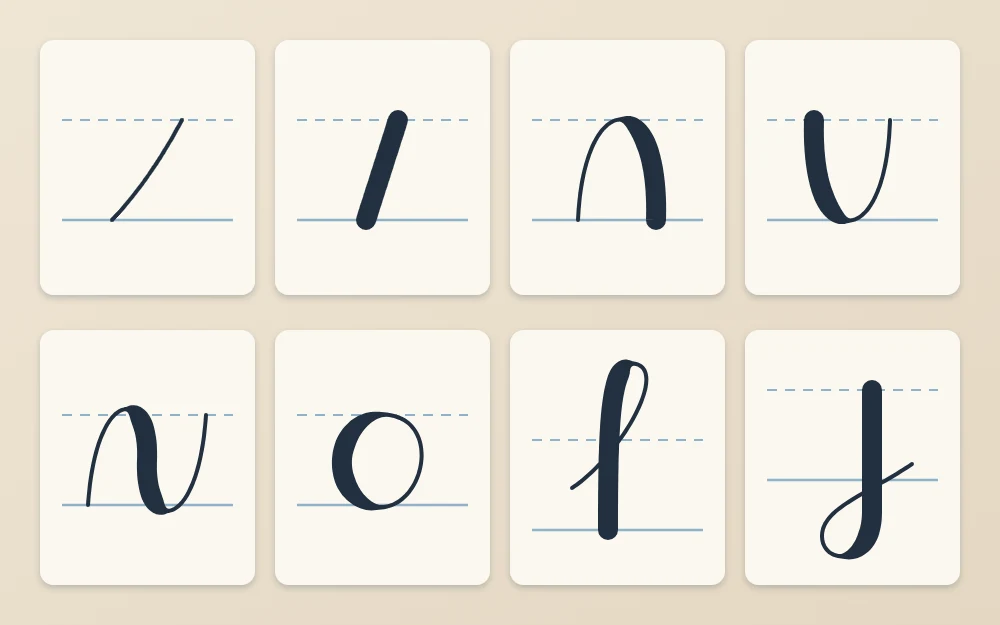
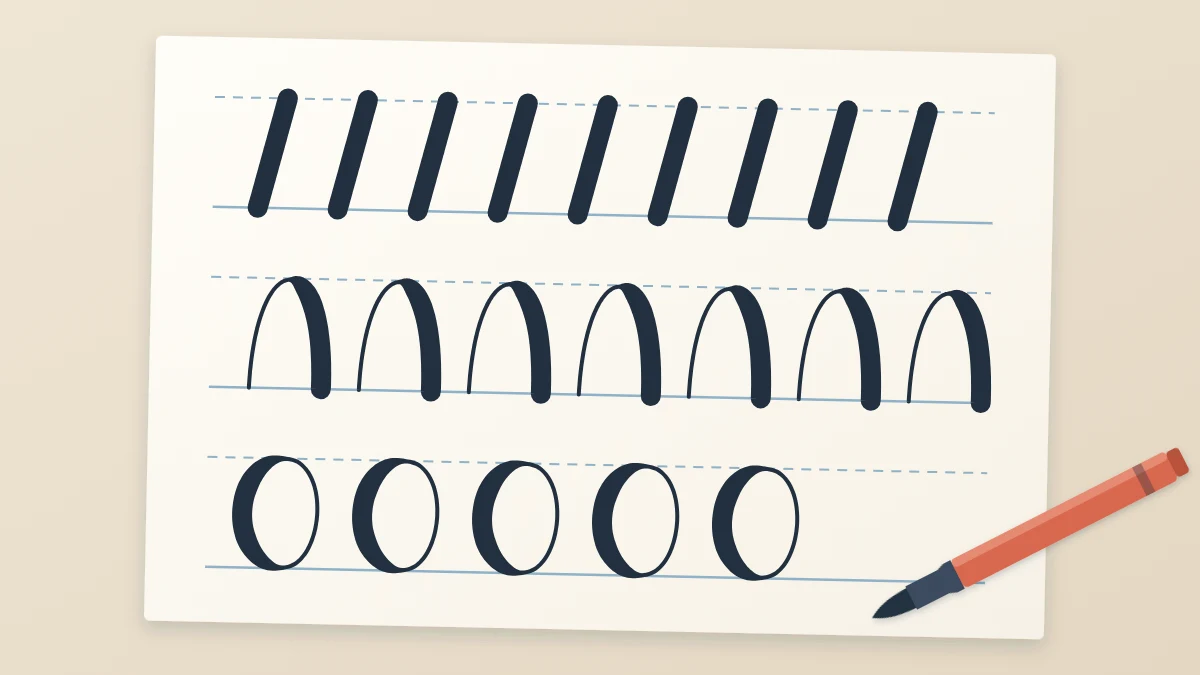
Read the tiles from left to right, top row first. The examples are drawn with a flexible tip, so you can see which parts travel downward: they are the thick parts. The shapes stay exactly the same when you draw them with a single line weight.
One line weight or two
With a fineliner, gel pen, bullet-tip marker or pencil, every stroke comes out at one weight no matter how hard you press. That is fine. The path of the stroke is what you are learning, and monoline lettering uses these same shapes as they are.
With a brush pen, pressure changes the line: firmer pressure on the way down makes a thick downstroke, and a light touch on the way up makes a thin upstroke. Controlling that change is a separate skill with its own practice.
How the strokes build letters
Once the strokes feel familiar, letters become short recipes. A few examples:
- i and u: one underturn for i, two for u, each led in by an upstroke.
- n and m: in a simple print style, n is a downstroke followed by an arch that branches from the stem. In a script, the same letter is an overturn followed by a compound curve, and m has one more overturn in front.
- a, d, g and q: an oval first, then a stroke on its right side. For a, that stroke is a downstroke or an underturn; for d, it is taller; for g, it is a descending loop.
- l, b, h and k: an ascending loop, or a plain tall downstroke in print styles, followed by an underturn, an oval-like bowl or a compound curve.
- j and y: a descending loop, with an underturn in front for y.
- o, c and e: the oval, complete or left open.
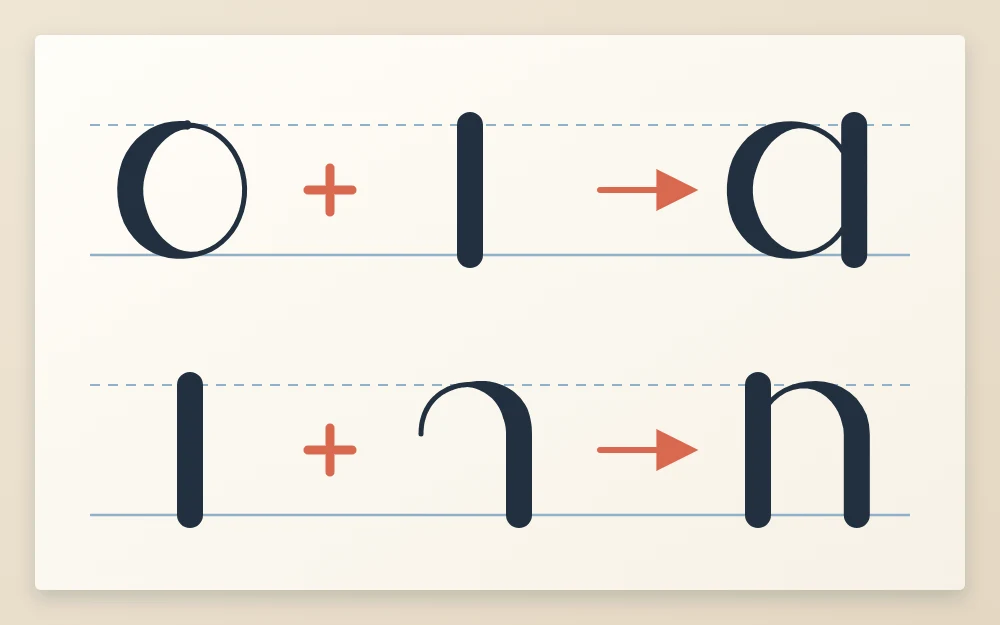
What to notice in these two recipes is where the strokes meet. In a, the downstroke touches the right side of the oval without leaving a gap or cutting into it. In n, the arch leaves the stem a little below the x-height line, not from the very top. Letters such as s, x and z do not fit the system neatly; treat them as special cases and learn them later. Knowing the names of letter parts, such as stem and bowl, helps you describe these joins.
How to practice each stroke as a row
- Rule four or five sets of guide lines on one page.
- Choose one stroke and draw it slowly three times, checking where it starts and stops.
- Fill the rest of the row with that stroke, leaving a gap about as wide as the stroke itself.
- Stop at the end of the row and circle your best two. Look at what makes them better.
- Draw a second row of the same stroke, aiming to match the circled ones.
- Move to the next stroke. A page with two rows each of three or four strokes is a full session.
If you are left-handed, work each row with a scrap sheet under your hand, or turn the paper slightly clockwise so your hand stays below the line and off the wet ink.
What to check in a finished row
- Height: every stroke touches both of its lines, with none floating or overshooting.
- Slant: the downward parts are parallel to each other.
- Width: overturns, underturns and ovals are about the same width across the row.
- Curves: turns are smooth and rounded, not pointed like a v.
Common mistake
Rushing to fill the page. A row drawn fast repeats the same error twenty times. Slow down until each stroke is a decision.
When to move on
You do not need perfect rows before you try letters. Move on when most strokes in a row touch their lines and lean the same way, even if a few wobble. That often takes several short sessions, and it varies a good deal from person to person.
Keep the strokes as a warm-up after that. A few rows at the start of each session, or a longer set of warm-up drills for steady lines, continues to pay off long after you have started lettering words.
Frequently asked questions
Do I need a brush pen to learn the basic strokes?
No. The eight strokes are paths, and you can learn every one of them with a pencil or a fineliner at a single line weight. A brush pen adds thick downstrokes and thin upstrokes through pressure, which is a second skill. Many beginners find it easier to learn the shapes first and add a flexible tip later.
How long should I practice strokes before drawing letters?
There is no fixed number of days. A reasonable sign is that most strokes in a row touch their guide lines and lean at the same angle. For many people that takes several short sessions. You can start simple letters before the strokes are perfect and keep the rows as a warm-up.
Why do my ovals look uneven?
Ovals are usually the hardest of the eight strokes. Common causes are starting at the very top instead of slightly to the right, drawing from the fingers only, and going too fast around the base. Try a slower, steady speed, move from the forearm, and aim for a shape clearly narrower than a circle.